
Installer et utiliser Docker sous Debian 9
Source : https://www.digitalocean.com/community/tutorials/how-to-install-and-use-docker-on-debian-9
Vous n’utilisez pas Debian 9 ? Choisissez une autre version :
- Automated: Ansible
- CentOS 7
- Ubuntu 18.04
- Ubuntu 16.04
- Automated: Docker request
- Automated: Bash request
- Debian 8 request
- Ubuntu 14.04 request
Une version précédente de ce tutoriel a été écrite par finid.
Introduction
Docker est une application qui simplifie le process de gestion de processus d’applications dans des conteneurs. Les Conteneurs vous permettent de lancer vos applications dans des process isolés des ressources. Ils sont similaires a des machines virtuelles ( VMs), mais les conteneurs sont plus portables, utilisent les ressources de manière plus efficiente, mais sont plus dépendants du système d’exploitation hôte.
Pour une introduction détaillée aux différents composants d’un conteneur Docker, consultez The Docker Ecosystem: An Introduction to Common Components.
Dans ce tutoriel, Vous allez installer et utiliser Docker Community Edition (CE) sous Debian 9. Vous installerez Docker lui-même, travaillerez avec des conteneurs et des images, et pousserez une image sur un dépôt Docker.
Prérequis
Pour suivre ce tutoriel, vous aurez besoin de:
- Un serveur Debian 9 set up by following the Debian 9 initial server setup guide, avec un utilisateur non-root avec privilège sudo.
- Un compte sur Docker Hub si vous souhaitez créer vos propres images et les pousser sur le Hub Docker Hub, comme expliqué aux étapes 7 et 8.
Etape 1 – Installer Docker
Le paquet d’installation Docker disponible sur le dépôt officiel Debian repository n’est pas forcément la dernière version. Pour s’assurer d’obtenir la dernière version, nous installerons Docker depuis le dépôt officiel Docker. Pour faire cela, nous allons ajouter une nouvelle source de paquets, et la clé GPG de Docker pour s’assurer que les téléchargements sont valides, puis installer le paquet.
D’abord, mettez à jour votre liste de paquets existante :
$ sudo apt update
Ensuite, installez quelques paquets prérequis qui permettront à apt d’utiliser des paquets à travers HTTPS:
$ sudo apt install apt-transport-https ca-certificates curl gnupg2 software-properties-common
Puis ajoutez la clé GPG pour le dépôt officiel Docker à votre système:
$ curl -fsSL https://download.docker.com/linux/debian/gpg | sudo apt-key add -
OK
$
Ajoutez le dépôt Docker aux sources APT :
$ sudo add-apt-repository "deb [arch=amd64] https://download.docker.com/linux/debian $(lsb_release -cs) stable"
Ensuite, mettez à jour la base de données des paquets avec les paquets Docker du dépôt nouvellement ajouté :
$ sudo apt update
Assurez-vous que vous êtes sur le point d’installer depuis le dépôt Docker au lieu du dépôt Debian par défaut :
$ apt-cache policy docker-ce
Vus verrez un affichage comme celui-ci, cependant la version de Docker peut être différente : Affichage de « apt-cache policy docker-ce »
docker-ce:
  Installed: (none)
  Candidate: 18.06.1~ce~3-0~debian
  Version table:
     18.06.1~ce~3-0~debian 500
        500 https://download.docker.com/linux/debian stretch/stable amd64 Packages
Remarquez que docker-ce n’est pas installé, mais le candidat pour l’installation est depuis le dépôt Docker pour Debian 9 (stretch).
Finalement, installez Docker :
$ sudo apt install docker-ce
Docker doit maintenant être installé, le démon démarré, et le process activé pour se lancer au boot. Vérifiez qu’il tourne :
$ sudo systemctl status docker
L’affichage doit être similaire au suivant, montrant que le service est actif et tourne :
Output● docker.service - Docker Application Container Engine
   Loaded: loaded (/lib/systemd/system/docker.service; enabled; vendor preset: enabled)
   Active: active (running) since Thu 2018-07-05 15:08:39 UTC; 2min 55s ago
     Docs: https://docs.docker.com
  Main PID: 21319 (dockerd)
   CGroup: /system.slice/docker.service
           ├─21319 /usr/bin/dockerd -H fd://
           └─21326 docker-containerd --config /var/run/docker/containerd/containerd.toml
L’installation de Docker vous donne désormais non seulement le service Docker (démon) mais aussi l’utilitaire en ligne de commande docker , ou client Docker. Nous explorerons comment utiliser la commande docker plus loin dans ce tutoriel.
Etape 2 – Executer la ligne de commande Docker sans « sudo » (Optionnel)
Par défaut, la commande docker peut être lancée seulement par l’utilisateur root ou par un utilisateur membre du groupe docker, qui est créé automatiquement pendant le processus d’installation de Docker. Si vous essayez de lancer la commande docker sans la précéder de sudo ou sans faire partie du groupe docker group, vous obtiendrez un message comme celui-ci:
Outputdocker: Cannot connect to the Docker daemon. Is the docker daemon running on this host?.
See 'docker run --help'.
Si vous voulez éviter de taper sudo à chaque fois que vous utilisez la commande docker, ajoutez votre nom d’utilisateur au groupe docker :
$ sudo usermod -aG docker ${USER}
Pour appliquer la nouvelle appartenance au groupe, déconnectez-vous du serveur et reconnectez-vous, ou tapez ceci :
$ su - ${USER}
Il vous sera demandé votre mot de passe utilisateur pour continuer.
Vérifiez que votre utilisateur est maintenant ajouté au groupe docker en tapant :
$ id -nG
Outputsammy sudo docker
Si vous avez besoin d’ajouter un utilisateur au groupe docker sous lequel vous n’êtes pas connecté, déclarez cet utilisateur explicitement en utilisant :
$ sudo usermod -aG docker username
Le reste de cet article suppose que vous lancez les commandes en tant qu’utilisateur membre du groupe docker. si vous le le souhaitez pas, alors veuillez précéder toutes les commande de « sudo".
Explorons maintenant la commande docker.
Etape 3 – Utiliser la commande Docker
Utiliser docker consiste à lui passer une chaîne d’options et de commandes suivie d’arguments. La syntaxe prend cette forme :
docker [option] [command] [arguments]
Pour voir toutes les sous-commandes disponibles, tapez :
$ docker
Ainsi pour Docker 18, la liste complète des sous-commandes disponibles inclue :
Output
  attach      Attach local standard input, output, and error streams to a running container
  build       Build an image from a Dockerfile
  commit      Create a new image from a container's changes
  cp          Copy files/folders between a container and the local filesystem
  create      Create a new container
  diff        Inspect changes to files or directories on a container's filesystem
  events      Get real time events from the server
  exec        Run a command in a running container
  export      Export a container's filesystem as a tar archive
  history     Show the history of an image
  images      List images
  import      Import the contents from a tarball to create a filesystem image
  info        Display system-wide information
  inspect     Return low-level information on Docker objects
  kill        Kill one or more running containers
  load        Load an image from a tar archive or STDIN
  login       Log in to a Docker registry
  logout      Log out from a Docker registry
  logs        Fetch the logs of a container
  pause       Pause all processes within one or more containers
  port        List port mappings or a specific mapping for the container
  ps          List containers
  pull        Pull an image or a repository from a registry
  push        Push an image or a repository to a registry
  rename      Rename a container
  restart     Restart one or more containers
  rm          Remove one or more containers
  rmi         Remove one or more images
  run         Run a command in a new container
  save        Save one or more images to a tar archive (streamed to STDOUT by default)
  search      Search the Docker Hub for images
  start       Start one or more stopped containers
  stats       Display a live stream of container(s) resource usage statistics
  stop        Stop one or more running containers
  tag         Create a tag TARGET_IMAGE that refers to SOURCE_IMAGE
  top         Display the running processes of a container
  unpause     Unpause all processes within one or more containers
  update      Update configuration of one or more containers
  version     Show the Docker version information
  wait        Block until one or more containers stop, then print their exit codes
Pour voir les options disponibles à une commande spécifique, tapez :
docker docker-subcommand --help
Pour voir des informations au niveau système de Docker, utilisez:
docker info
Explorons certaines de ces commandes. Nous commencerons par travailler avec des images.
Etape 4 – Travailler avec des images Docker
Les conteneurs Docker sont construits à partir d’images Docker. Par défaut, Docker tire ces images du Docker Hub, un dépôt Docker géré par Docker, la compagnie derrière le projet Docker. Tout le monde peut héberger ses images Dockers sur le Docker Hub, ainsi la plupart des applications et des distributions Linux dont vous aurez besoin auront des images hébergées là-bas.
Pour vérifier si vous pouvez accéder et télécharger des images depuis le Docker Hub, tapez:
$ docker run hello-world
Le message suivant indiquera que Docker fonctionne correctement :
OutputUnable to find image 'hello-world:latest' locally
latest: Pulling from library/hello-world
9db2ca6ccae0: Pull complete
Digest: sha256:4b8ff392a12ed9ea17784bd3c9a8b1fa3299cac44aca35a85c90c5e3c7afacdc
Status: Downloaded newer image for hello-world:latest

Hello from Docker!
This message shows that your installation appears to be working correctly.
...
Docker was initially unable to find the hello-world
image locally, so it downloaded the image from Docker Hub, which is the
default repository. Once the image downloaded, Docker created a
container from the image and the application within the container
executed, displaying the message.
Vous pouvez chercher des images disponible sur le Docker Hub en utilisant la commande docker avec la sous-commande search. Par exemple, pour chercher l’mage Ubuntu image, tapez :
docker search ubuntu
Le script va explorer Docker Hub et retourner un listing de toutes les images dont le nom correspond à la chaîne de recherche. Dans le cas présent, l’affichage sera similaire à ceci :
OutputNAME                                                   DESCRIPTION                                     STARS               OFFICIAL            AUTOMATED
ubuntu                                                 Ubuntu is a Debian-based Linux operating sys…   8320                [OK]
dorowu/ubuntu-desktop-lxde-vnc                         Ubuntu with openssh-server and NoVNC            214                                     [OK]
rastasheep/ubuntu-sshd                                 Dockerized SSH service, built on top of offi…   170                                     [OK]
consol/ubuntu-xfce-vnc                                 Ubuntu container with "headless" VNC session…   128                                     [OK]
ansible/ubuntu14.04-ansible                            Ubuntu 14.04 LTS with ansible                   95                                      [OK]
ubuntu-upstart                                         Upstart is an event-based replacement for th…   88                  [OK]
neurodebian                                            NeuroDebian provides neuroscience research s…   53                  [OK]
1and1internet/ubuntu-16-nginx-php-phpmyadmin-mysql-5   ubuntu-16-nginx-php-phpmyadmin-mysql-5          43                                      [OK]
ubuntu-debootstrap                                     debootstrap --variant=minbase --components=m…   39                  [OK]
nuagebec/ubuntu                                        Simple always updated Ubuntu docker images w…   23                                      [OK]
tutum/ubuntu                                           Simple Ubuntu docker images with SSH access     18
i386/ubuntu                                            Ubuntu is a Debian-based Linux operating sys…   13
1and1internet/ubuntu-16-apache-php-7.0                 ubuntu-16-apache-php-7.0                        12                                      [OK]
ppc64le/ubuntu                                         Ubuntu is a Debian-based Linux operating sys…   12
eclipse/ubuntu_jdk8                                    Ubuntu, JDK8, Maven 3, git, curl, nmap, mc, …   6                                       [OK]
darksheer/ubuntu                                       Base Ubuntu Image -- Updated hourly             4                                       [OK]
codenvy/ubuntu_jdk8                                    Ubuntu, JDK8, Maven 3, git, curl, nmap, mc, …   4                                       [OK]
1and1internet/ubuntu-16-nginx-php-5.6-wordpress-4      ubuntu-16-nginx-php-5.6-wordpress-4             3                                       [OK]
pivotaldata/ubuntu                                     A quick freshening-up of the base Ubuntu doc…   2
1and1internet/ubuntu-16-sshd                           ubuntu-16-sshd                                  1                                       [OK]
ossobv/ubuntu                                          Custom ubuntu image from scratch (based on o…   0
smartentry/ubuntu                                      ubuntu with smartentry                          0                                       [OK]
1and1internet/ubuntu-16-healthcheck                    ubuntu-16-healthcheck                           0                                       [OK]
pivotaldata/ubuntu-gpdb-dev                            Ubuntu images for GPDB development              0
paasmule/bosh-tools-ubuntu                             Ubuntu based bosh-cli                           0                                       [OK]
...
Dans la colonne OFFICIAL, OK indique an image built and supported by the company behind the project. Once you’ve identified the image that you would like to use, you can download it to your computer using the pull subcommand.
Exécutez la commande suivante pour télécharger l’image officielle ubuntu sur votre ordinateur :
$ docker pull ubuntu
Vous verrez l’affichage suivant :
OutputUsing default tag: latest
latest: Pulling from library/ubuntu
6b98dfc16071: Pull complete
4001a1209541: Pull complete
6319fc68c576: Pull complete
b24603670dc3: Pull complete
97f170c87c6f: Pull complete
Digest: sha256:5f4bdc3467537cbbe563e80db2c3ec95d548a9145d64453b06939c4592d67b6d
Status: Downloaded newer image for ubuntu:latest
Après qu’une image ait été téléchargée, vous pouvez ensuite lancer un conteneur utilisant l’image téléchargée grâce à la sous-commande run. As you saw with the hello-world example, if an image has not been downloaded when docker is executed with the run subcommand, the Docker client will first download the image, then run a container using it.
Pour voir les images qui ont été téléchargées sur votre ordinateur, tapez :
$ docker images
L’affichage devrait ressembler au suivant :
OutputREPOSITORY          TAG                 IMAGE ID            CREATED             SIZE
ubuntu              latest              16508e5c265d        13 days ago         84.1MB
hello-world         latest              2cb0d9787c4d        7 weeks ago         1.85kB
Comme vous le verrez plus tard dans ce tutoriel, les images que vous utilisez pour faire tourner des conteneurs peuvent être modifiées et utilisées pour générer de nouvelles images, qui peuvent ensuite êtres uploadées (pushed est le terme technique) sur le Docker Hub ou d’autres dépôts Docker.
Regardons comment faire tourner les conteneurs plus en détail.
Etape 5 – Faire tourner un Conteneur Docker
Le conteneur hello-world que vous avez lancé à l’étape précédente is an example of a container that runs and exits after emitting a test message. Containers can be much more useful than that, and they can be interactive. After all, they are similar to virtual machines, only more resource-friendly.
As an example, let’s run a container using the latest image of Ubuntu. The combination of the -i and -t switches gives you interactive shell access into the container:
$ docker run -it ubuntu
Votre invite de commande devrait changer to reflect the fact that you’re now working inside the container and should take this form:
Outputroot@d9b100f2f636:/#
Note the container id in the command prompt. In this example, it is d9b100f2f636. You’ll need that container ID later to identify the container when you want to remove it.
Now you can run any command inside the container. For example, let’s
update the package database inside the container. You don’t need to
prefix any command with sudo, because you’re operating inside the container as the root user:
Outputroot@d9b100f2f636:/# apt update
Then install any application in it. Let’s install Node.js:
Outputroot@d9b100f2f636:/# apt install nodejs
This installs Node.js in the container from the official Ubuntu repository. When the installation finishes, verify that Node.js is installed:
Outputroot@d9b100f2f636:/# node -v
You’ll see the version number displayed in your terminal:
Outputv8.10.0
Any changes you make inside the container only apply to that container.
Pour quitter le conteneur, tapez exit à l’invite.
Regardons ensuite comment administrer les conteneurs sur notre système.
Etape 6 – Administrer des conteneurs Docker
Après avoir utilisé Docker pendant un certain temps, vous allez avoir beaucoup de conteneurs actifs (running) et inactifs sur votre ordinateur. Pour voir ceux qui sont actifs, utilisez :
$ docker ps
Vous verrez un affichage similaire au suivant :
OutputCONTAINER ID IMAGE COMMAND CREATED
Dans ce tutoriel, vous avez démarré deux conteneurs; un depuis l’image hello-world et un autre depuis l’image ubuntu . Ces deux conteneurs ne tournent plus, mais ils existent toujours sur votre système.
Pour voir tous les conteneurs – actifs et inactifs, lancez docker ps avec l’option -a :
$ docker ps -a
Vous verrez un affichage similaire à celui-ci :
d9b100f2f636        ubuntu              "/bin/bash"         About an hour ago   Exited (0) 8 minutes ago                           sharp_volhard
01c950718166        hello-world         "/hello"            About an hour ago   Exited (0) About an hour ago                       festive_williams
Pour voir le dernier conteneur que vous avez créé, passez l’option -l :
$ docker ps -l
CONTAINER ID        IMAGE               COMMAND             CREATED             STATUS                      PORTS               NAMES
d9b100f2f636        ubuntu              "/bin/bash"         About an hour ago   Exited (0) 10 minutes ago                       sharp_volhard
Pour démarrer un conteneur arrêté, utilisez docker start, followed by the container ID or the container’s name. Let’s start the Ubuntu-based container with the ID of d9b100f2f636:
$ docker start d9b100f2f636
Le conteneur va démarrer, et vous pouvez utiliser docker ps pour voir son statut :
CONTAINER ID        IMAGE               COMMAND             CREATED             STATUS              PORTS               NAMES
d9b100f2f636        ubuntu              "/bin/bash"         About an hour ago   Up 8 seconds                            sharp_volhard
Pour arrêter un conteneur qui tourne, utilisez docker stop, suivi de l’ID ou du nom du conteneur. This time, we’ll use the name that Docker assigned the container, which is sharp_volhard:
$ docker stop sharp_volhard
Once you’ve decided you no longer need a container anymore, remove it with the docker rm command, again using either the container ID or the name. Use the docker ps -a command to find the container ID or name for the container associated with the hello-world image and remove it.
$ docker rm festive_williams
You can start a new container and give it a name using the --name switch. You can also use the --rm switch to create a container that removes itself when it’s stopped. See the docker run help command for more information on these options and others.
Containers can be turned into images which you can use to build new containers. Let’s look at how that works.
Etape 7 – « Committer » les changement dans un Conteneur vers une image Docker
Quand vous démarrez une image Docker, vous pouvez créer, modifier, et supprimer des fichiers comme vous pouvez le faire avec une machine virtuelle. The changes that you make will only apply to that container. You can start and stop it, but once you destroy it with the docker rm command, the changes will be lost for good.
Cette section vous montre comment sauvegarder l’état d’un conteneur en tant que nouvelle image Docker.
After installing Node.js inside the Ubuntu container, you now have a container running off an image, but the container is different from the image you used to create it. But you might want to reuse this Node.js container as the basis for new images later.
Then commit the changes to a new Docker image instance using the following command.
$ docker commit -m "What you did to the image" -a "Author Name" container_id repository/new_image_name
L’option -m est pour le message de commit that helps you and others know what changes you made, while -a is used to specify the author. The container_id is the one you noted earlier in the tutorial when you started the interactive Docker session. Unless you created additional repositories on Docker Hub, the repository is usually your Docker Hub username.
For example, for the user sammy, with the container ID of d9b100f2f636, the command would be:
$ docker commit -m "added Node.js" -a "sammy" d9b100f2f636 sammy/ubuntu-nodejs
When you commit an image, the new image is saved locally on your computer. Later in this tutorial, you’ll learn how to push an image to a Docker registry like Docker Hub so others can access it.
Listing the Docker images again will show the new image, as well as the old one that it was derived from:
$ docker images
You’ll see output like this:
OutputREPOSITORY               TAG                 IMAGE ID            CREATED             SIZE
sammy/ubuntu-nodejs   latest              7c1f35226ca6        7 seconds ago       179MB
ubuntu                   latest              113a43faa138        4 weeks ago         81.2MB
hello-world              latest              e38bc07ac18e        2 months ago        1.85kB
In this example, ubuntu-nodejs is the new image, which was derived from the existing ubuntu
image from Docker Hub. The size difference reflects the changes that
were made. And in this example, the change was that NodeJS was
installed. So next time you need to run a container using Ubuntu with
NodeJS pre-installed, you can just use the new image.
Vous pouvez aussi construire des images depuis un Dockerfile, which lets you automate the installation of software in a new image. Cependant c’est en dehors du scope de ce tutoriel.
maintenant partageons la nouvelle image avec d’autres personnes, de manière à ce qu’ils puissent créer des conteneurs à partir d’elle.
Etape 8 – Pushing Docker Images to a Docker Repository
The next logical step after creating a new image from an existing image is to share it with a select few of your friends, the whole world on Docker Hub, or other Docker registry that you have access to. To push an image to Docker Hub or any other Docker registry, you must have an account there.
This section shows you how to push a Docker image to Docker Hub. To learn how to create your own private Docker registry, check out How To Set Up a Private Docker Registry on Ubuntu 14.04.
To push your image, first log into Docker Hub.
$ docker login -u docker-registry-username
You’ll be prompted to authenticate using your Docker Hub password. If you specified the correct password, authentication should succeed.
Note: If your Docker registry username is different from the local username you used to create the image, you will have to tag your image with your registry username. For the example given in the last step, you would type:
$ docker tag sammy/ubuntu-nodejs docker-registry-username/ubuntu-nodejs
Then you may push your own image using:
docker push docker-registry-username/docker-image-name
To push the ubuntu-nodejs image to the sammy repository, the command would be:
$ docker push sammy/ubuntu-nodejs
The process may take some time to complete as it uploads the images, but when completed, the output will look like this:
OutputThe push refers to a repository [docker.io/sammy/ubuntu-nodejs]
e3fbbfb44187: Pushed
5f70bf18a086: Pushed
a3b5c80a4eba: Pushed
7f18b442972b: Pushed
3ce512daaf78: Pushed
7aae4540b42d: Pushed

...
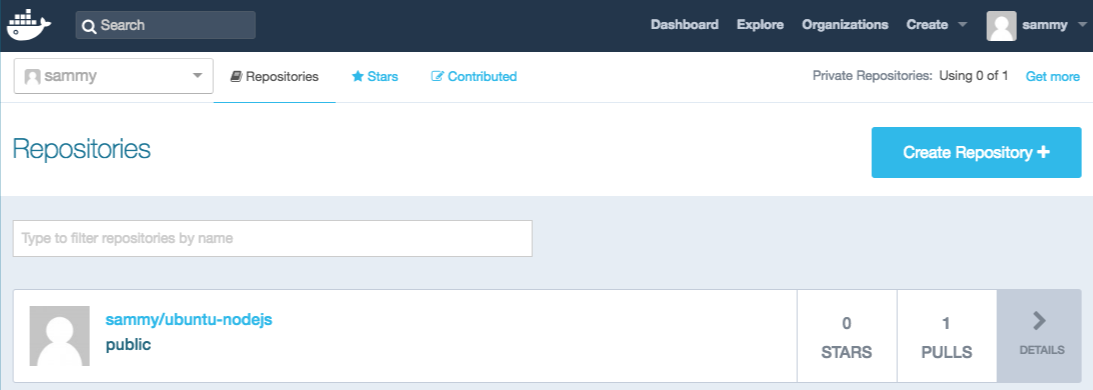
After pushing an image to a registry, it should be listed on your account’s dashboard, like that show in the image below.
If a push attempt results in an error of this sort, then you likely did not log in:
OutputThe push refers to a repository [docker.io/sammy/ubuntu-nodejs]
e3fbbfb44187: Preparing
5f70bf18a086: Preparing
a3b5c80a4eba: Preparing
7f18b442972b: Preparing
3ce512daaf78: Preparing
7aae4540b42d: Waiting
unauthorized: authentication required
Log in with docker login and repeat the push attempt. Then verify that it exists on your Docker Hub repository page.
You can now use docker pull sammy/ubuntu-nodejs to pull the image to a new machine and use it to run a new container.
Conclusion
En suivant ce tutoriel vous avez installé Docker, travaillé avec des images et des conteneurs, et poussé une image modifiée sur le Hub Docker. Maintenant que vous connaissez les bases, explorez les other Docker tutorials dans la Communauté DigitalOcean.
